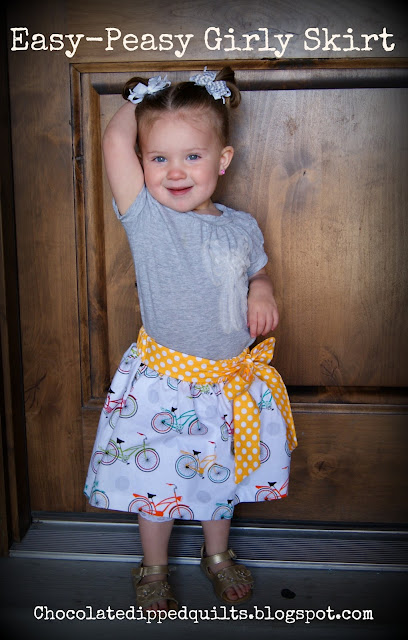
I came across this super cute bike fabric and loved it! I couldn't stop thinking about it for days so I finally went back to get some, not sure what I was going to do with it. Fast forward a few days and I am shopping for some summer clothes with my daughter. She insists on all skirts. She's a very opinionated girl when it comes to clothes (yes, we are in trouble)! After looking at a few skirts with her, the idea popped into my head that I needed to make a skirt with the bike fabric. This skirt was so easy and came together so fast, that I decided to share it with all of you.
First: Measure your kiddo. I recommend measuring from their belly button to their knee and around their waist. You could also measure a skirt that currently fits them to get the correct sizing.
 Second: Gather your supplies. My daughter is a pretty tiny 2 1/2 year old so I only needed 10 inches of material for her skirt (length wise) plus the width of the fabric off the bolt (usually about 44-45" wide). You may need more or less depending on your kid. You'll also want to get a cordinating fabric for the waistband and sash. 1/4 yard will be perfect (not a fat quarter). The last thing you'll need to buy is the elastic. I bought 1 1/2" Heavy Stretch Waistband Elastic. You'll also need matching thread (of course) and a sewing machine.
The fabric I used is Cruzin' Bikes Fabric by Barbara Jones of QuiltSoup for Henry Glass Co. and Yellow Small Dots by Riley Blake Designs.
Third: Cut your main fabric to size. Make sure to add in an extra inch for the hem. My daughter measured 9 inches so I cut my length at 10 inches. Fold the bottom edge up 1 inch, I like to use a ruler to make sure it's even. Iron seam. Sew a quarter inch from the bottom to create hem. (You can also use a serger in this step, but since I don't have one I don't use one.) Sew each end together, this will create a big loop with your fabric.
Fourth: Cut your elastic to the size of waist, make sure to add 1/2 inch to account for seams. Cut your coordinating fabric into a 4 inch strip for the waistband. Fold fabric in half width-wise and baste open side together. Slide elastic through the hole. Fabric will be all bunched up. I like to keep the fabric from sliding by using a safety pin.
Fifth: Sew ends of elastic together. Unpick the basting on both sides of fabric 3-4 inches. Pull fabric away from elastic. Sew ends of fabric together with the front sides of the fabric facing each other. Fold the fabric back over the elastic and baste back together where the previous basting was.
You are done with the waistband!
Sixth: Sew the waistband to the skirt fabric. Since both the skirt and the waistband fabric are the same length, they should match up perfectly. It can be a little hard to do this since you're dealing with elastic. I like to pull the elastic tight while I sew a few inches of waistband fabric to skirt fabric. You can see in the picture how I am holding the bunched up fabric out of the way so I can match up the fabric. After I sew a bit, I move the fabric on the elastic out of the way and sew the next section.
Seventh: Cut another 4 inch strip of fabric from the same fabric that you used for the waistband. This will be for your sash. Fold in half and cut on the diagonal, this will create the two pieces you need for the sashes. Make sure to off center the diagonal cut if you want to tie a bow on the side of the skirt. If you want the bow in the center, then cut the diagonal half way down the strip of fabric. Sew each diagonal cut piece of fabric right sides together. Turn right sides out and iron.
Eighth: Turn wrong sides back together and sew along the long edges. Make sure not to sew the other end shut. Turn each sash right sides out. I like to use a pencil, just stick the pencil in the hole, bunch the fabric up on the pencil, then peel the fabric down.
You should now have two sides for the sash/bow. One longer than the other.
Ninth: Attach the sashes by sewing the straight side of one sash to one side of the waistband and sewing the straight side of the other sash to the opposite side of waistband. Make sure that the longer sash is on the opposite side of where you want to tie your bow.
Tenth: Put it on your little cutie and watch her dance!


4 comments:
Logan! I had no idea you quilted or sewed!!! LOVE this!!!
Adorable (I'm a big fan of anything bicycle), and your little model/fashionista makes the project even more fun!
What a great skirt. Pinning for my little girls!
Oh how adorable! I am pinning this too. Hopefully I can get one sewn up quick for kids clothing week.
Post a Comment